Sunday, November 30, 2014

Beware of Snakes

Warning: for those of you who do not want to see a really cool picture of snakes, you may opt out now. For the rest of you, scroll down. I detest rattlesnakes, but those of you who know me or have been reading here for a while, already know that. However, I took this photo the other day and I have to post it because this blog is a journal of what goes on around here and one day future grand kids will think their Pap and Gran were cool for taking pictures like this...or crazy...or both!
.
.
.
.
.
.
.
.
.
.
.
.
.
.
.
.


It was really cold in the morning and when snakes are cold, they won't move so that's the only reason I got as close as I did. I just took the picture. DH caught them and we added the baseball to give you a perspective. Each snake is 5' long. Anyone wanna play catch?

Friday, November 28, 2014

Reindeer - Tutorial


I thought I had posted a tutorial  for these fellas at some point, but I guess I was mistaken and I've had a few requests on how to make these. I worked on some this week and took some photos of the process.

Here are the supplies:

                             
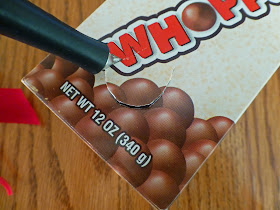
Whoppers
Tan yarn
tan felt
brown felt
small red pom pom
large brown pom pom (optional and not pictured)) - this is for the tail and I usually just make a small pom pom out of the tan yarn, but I have, on occasion, used a large brown pom pom in a pinch..
wiggly eyes
red bow
bell
printed tag
hot glue gun
scissors
Xacto knife

First step. Find a good movie to watch as you sit down to make pom poms. I suppose you don't need an entire movie unless you are making a whole herd like I do. You need three sizes of pom poms. A large one for the face -a medium one for the muzzle - and a small one for the tail.


For the large one, I wrap yarn around 4 fingers:


For the medium sized one, I wrap yarn around 3 fingers:


And for the small one I wrap yarn around 2 fingers:


Then you trim the stuffing out of them. I find it the easiest to have a large bowl at my feet and trim into that or you will have yarn fluff everywhere.


Sketch out some antlers onto the tan felt, fold it over, and cut a matching pair of antlers. I can not draw to save my life so comical antlers is what you get:


Glue these on to the front of the Whopper box:
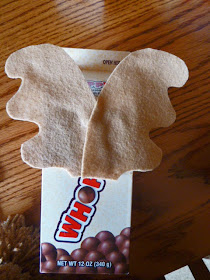
                                                  

Then cut little ears out of the brown felt. I wait to glue them onto the antlers after I have glued the pom poms so that I have a better sense of where to place them, but this is not rocket science so do what works for you.


Next, hot glue the large pom pom on to the front of the Whopper box and then add the little brown for the ears:


Then glue the medium pom pom onto the large pom pom:


 Next glue on the eyes:


And the nose:


String a bell through the wire on the bow, twist to secure, and glue to the box just under the face:


Print out a label and attach to the reindeer with double stick tape:


Turn your Whopper box around to the back and cut a rounded U shaped flap a few inches from the bottom of the box:

Make sure you can easily shake a Whopper out or you may have a constipated reindeer. Sorry. Don't ask me how I know this.

                             
 Finally, hot glue the smaller pom pom over the flap, being careful to not glue the flap shut.


And there you have it!


I make these for everyone - Marines, college kids, professors, little kids, our UPS man, cousins, the Culligan people where we get water, the Farm Store, the mailman, the neighboring ranches, the propane man, the equipment operator who is working on our roads, and this year the sale barn crew and the Safari Club.

Hope y'all enjoy making these. They're fun to make and to give.

Monday, November 24, 2014

Machine Embroidered Snowflakes

Well, my goodness! Y'all sure do know how to make a gal feel good! Thank y'all so much for taking the time to stop by and leave such lovely comments on my blog hop post. I begged off from ranch duty on Saturday  in order to reply back to y'all. :) If you haven't heard back from me, you came across as a non-reply blogger.

Many of you commented about how much I got done. It just looks like a lot when its all shared in one post. Truth is, these photos are from last year and the year before. I participated in a project called Christmas Through the Year hosted by Darlene, a dear lady. The idea was to make a Christmas gift each month. Brilliant! It was so nice to give so many hand made gifts to friends and family. I didn't do that this year, but you can bet I'll be doing it from now on!

So there you go. I am not super woman - FAR from it! :) If you saw my windows right now, I promise you would be fussing at me - they are scandalous.

I had some requests for more information on how to make these embroidered snowflake so I'm sharing more details on those today. These are the best kind of snowflakes - not only are they pretty - they don't need shoveling!

As for you reindeer lovers, I'm working on a tutorial and hope to have it ready to go on Friday, the day after Thanksgiving.

I bought the snowflake pattern at Embroidery Library a few years back. They often run great sales and I have never had a problem with any of their designs. They stitch out so nicely. Here's the link.

There are 6 different snowflakes in this set:

                                           Machine Embroidery Designs at Embroidery Library

I use Fabric-solvy to stitch on:


I can get 36 snowflakes out of this 9 yd roll. Once your design is stitched, you simply place your snowflake in a warm bowl of water and the foundation dissolves, leaving a pretty embroidered snowflake.


These designs take a bit to stitch out. It varies with each design, but it averages just over 40 minutes per flake.


I don't have to baby sit it much. I just go about doing other things while keeping one ear open and peeking in every now and then. My machine was stitching up a storm...a snowstorm. :)


Until I ran out of thread:


I've only made them in white, but you could of course use any color. I wouldn't recommend using a metallic thread because it may tend to break and snarl with this much stitching, but you could spray some glitter on them for a sparky effect if you wish.

I am charmed by these little snowflakes. That is, if one can be charmed by a snowflake. :)


If you stop in on Friday, I'll have that reindeer tutorial. They're kind of charming too! :)

Thursday, November 20, 2014

'Twas The Night - My Day

Today's my day to share some ideas for quick Christmas gifts so if you're here via the Twas The Night Blog Hop, welcome to the end of the dirt road!

                               Twas the night....Marlene has the schedule
Thank you Madam Samm from Sew We Quilt for all you do to inspire us throughout the year and a special thanks goes out to Marlene from Stitchin' By The Lake for organizing all the details and emails that kept us all on track - your time and dedication and patience is truly appreciated!

I've already added many a project to my gift making list and I hope you've found inspiration as well these past couple of weeks. And now I get to share what Cathy from Cate's Linens ,  made for me. I  received this darling set of  a snack mat


and a mug rug,

just perfect for adding a bit of Christmas cheer to my stitching time in the evenings! I'm all about nibbling on a good cookie while enjoying a good mug of hot tea and now I'll smile and think of sweet Cathy every time I look at this pretty set. Thank you so much, Cathy for your thoughtful gift!


To see what I made, hop on over and visit  Thearica at Pig Tales and Quilts . I sure did have fun putting her package together and what I made for her is one of my favorite gifts to make. And a little birdie told me that Thearica is having a birthday today so y'all be sure and wish her a happy birthday when you pop over there! Happy Birthday Thearica!! May your day be extra special!

 I wanted to share a few other projects that I've made in the past that are quick to put together.

It seems my go to gift these past few years has been these potholders originally found at Deanna's over at Wedding Dress Blue. Here's the link to her tutorial for the string pieced potholders.


 I've lost count, but I'm fairly certain I am in the neighborhood of making 50 sets of these potholders and just when I think I've made all I'm going to make, I get requests for more!

The same thing has happened with these Reindeer Whoppers:


I've been making these for nigh on 20 years and every year I tell myself I am NOT making any more and then every year I end up making yet another herd.

I mean honestly, how can I NOT make them for just about everyone at the sale barn this year?! You know those cattlemen will get a kick out of them, whether they admit it or not. In fact, now that I've written that, I think I ought to start hoarding Whoppers and making reindeer because I just found out that we have to take something for the Safari Club Christmas Party too.

And last year I made a dozen of these pretty snowflakes.


Well, I didn't actually make them, my sewing machine did. If your machine has embroidery capabilities, these are a fun project they take a lot of thread, but I think they turn out so pretty. They are nice additions to packages and trees.

And then for the finishing touch, these bags from Jeni over at  In Color Order  , are a great quick project. I've made a couple dozen of these as well and there are more to be made because I keep giving them away.


I often give a set of potholders in a matching bag as a gift:


Here are the the rest of my fellow bloggers rounding out today's schedule.

Friday, Nov. 21

Whew! That was a fun hop! Thank you Madam Samm and Marlene! Now I had better get to making some of these gifts instead of just writing about them! Thank you again for popping in!

Wednesday, November 19, 2014

The Happy Hum of the Sewing Machine

I made good progress on stitching projects while DH went in search of that elusive elk in September, but my sewing machine has been silent since then. All stitching attention has been focused on hand stitching his wool quilt in the evenings, but after a week of 3:30 wake up calls, I find that I am nodding off by 7:30 so the stitching is slow going.

I wanted to make just a little more progress on my UFO's before the end of the year so I made a point to dedicate a few hours the other day and applique the words onto my Three R's quilt:


 When the thermometer looks like this:


And the view from the window looks like this:


And the road looks like this:


This is a good place to park:


Unless you are my husband. Then you are out in a pretty good snowstorm, on foot, doing this:


This nice deer is a welcome addition to our winter meat supply.

Then I stitched some more and added blocks to my Weaving the Rails scrap quilt.All of these plaids just make me happy.


 Snow. Hot Tea.  A nap...under a quilt of course. 

That, along with the hum of the sewing machine was just what I needed and made for a really good Sunday. 

Saturday, November 15, 2014

Shipping Day

Yesterday was shipping day.


 Its payday for the ranch and this is a GOOD year. If you've been to the meat counter lately, you can attest to that. Cattle prices are wonderful, but everything that combines to put that meat on your table: hay, feed, medicine, pour-on... it doesn't take long to rack up a $7000 bill when we're at the vet supply store. Even though this is a year that we'll end up in the black, we're really just making up for all those years where both ends did not meet in the middle. If you ranch for the money, you're in the wrong business, but there isn't a better life.

The boys left out horseback early Thursday morning and as they walked out to the barn to load their horses, it began to snow, Our first snow of the season. I ran outside to grab the receipt from the propane man just as it started to accumulate.


On Thursday we didn't even break the freezing mark. No worries though. The crock pot was hard at work making dinner.  Taco Soup was on the menu and the cast iron skillet was ready and waiting to bake cornbread by 6 am. I was planning on making something else, but the weather dictated a change in plans and the way those boys piled their plates and bowls at noon, it was a good decision.

I made biscuits and gravy and eggs and sausage for breakfast on Thursday morning hoping a hearty breakfast would keep them warm. Heck, I was cold just looking out the window and I felt a little guilty being inside in a warm kitchen.

DH pulled on multiple layers and I wondered how he was going to get on his horse. After they shipped out the calves,


they brought in the bulls and vaccinated them:


Yesterday morning I made breakfast burritos and a big pan of cinnamon rolls. I also made DH's favorite cookies - Gingersnaps and Special K Cookies. The boys went to town on the cookies and requested recipes were copied and stashed in coat pockets as leftover cookies were sacked up and stashed in pick up seats.

We had all sorts of activity going on yesterday morning and it was a given that buyers and brand inspectors and the crew would be shucking their coats in my mud room at some point during the morning so I kept the coffee hot and let them munch on baked goods.

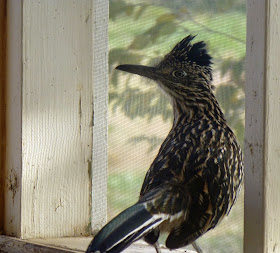
When I went out to grab something from the deep freeze this morning, I found a visitor on the back porch. Meet Charlie:


I love roadrunners. He doesn't even look like a roadrunner here. He looks more like a Kookaburra from this angle:


I think they are funny birds.


 DH's wool quilt is mocking me from the sofa and I am sorely tempted to give in and add a few stitches. I've been working on it in the evenings and its been a toasty companion. I've been teasing DH that he might have to bribe me to give it to him, Hopefully he won't mind sharing. :) I imagine he'll be wanting it after a day horseback in 20° weather: