Friday, October 25, 2013

'Here Fishy Fishy' Baby Quilt Finished

It's time for Amy's Blogger's Quilt Festival and although ranch life has kept me away from the sewing machine lately, I have a quilt to add to the fun that I recently finished. Thank you, Amy, for giving us a place to gather and celebrate our love of quilting!

                                                Blogger's Quilt Festival - AmysCreativeSide.com

There will be lots of wonderful new blogs to discover and get ready for a slew of new inspiration as you browse through the wonderful quilts and read the stories behind them. Click HERE to be inspired!

If you popped in here via the festival, welcome to the end of the dirt road where quilting meets ranch life.

Every time I work on a baby quilt, I fall in love with it. These little fish were so much fun to applique. I've got a long way to go before I'm satisfied with my applique, but I just had to get over it and dive in or I'll never improve.


 Same goes for the quilting. I'm new to FMQ and I'm pretty tickled with it on this quilt. I didn't have one tuck or bobble on the backside although my stitch length seemed to vary and I'm thinking that had a lot to do with the fact that I wasn't able to keep a consistent speed. I need a cruise control on my machine. :)


I stitched slowly on the applique, but I still had my thread sort of lose tension every so often. Not sure what causes that, but I'll play around with some practice pieces and see if I can get it all lined out. You can see it on the mouth of the little starfish here:


I adore that little starfish with his wonky eyes. I straight line quilted the chevrons.


 Boy, those little buggars gave me a run for my money, but in the end, things lined up ok. This pattern is from Heather Mulder Peterson's book: Little Quilts 4 Kids. Her directions are wonderful, but I just had to get my head on straight when piecing them in order to make the best use of the fabric. This is Heather's fabric line as well and I'm thinking I need to add some more of it to my stash.

Then I didn't have a clue as to how to quilt the background fabric so I kind of winged it and I am thrilled with it! It was fun and liberating although my shoulders were sore when I finished.


I backed it with a green that I had in my stash that matched perfectly and the fun multicolored chevron stripe print in the fabric line made a darling binding.


And I added this little label that I showed y'all the other day:


And here's the finished quilt for a very special little boy::


Isn't that a darling pattern?


This quilt measures 44" x 47",  and it's on its way to my awesome niece and her husband who had their first baby in July. Yes, I am late, but I was waiting on the release of this fabric. They are avid fishing fanatics so I knew I had to make this quilt, using Heather's darling fabric, for her sweet baby boy.


Monday, October 21, 2013

Quilt Labels

Can not even put into words how good it was to have our boy home for a bit... nor how hard it was to put him on that plane yesterday. Ugh. Now we're counting down 8 months until he's back from his next deployment. It's going to be a long 8 months.

We have enjoyed his presence, his amazing hugs, his quick wit, his sparkling eyes when he gets tickled, the conversations, the soothing sound of him playing his guitar, and it is far too quiet around here today.

It's been a coon's age since I've sewn anything - over a month, but I have a few quilts that are back from the quilter's and ready for binding so I tried to fill some time to stop myself from moping. Not sure if I was very successful, but I did manage to get some quilt labels made.

Labeling my quilts has always been a struggle for me. Don't rightly know why because I do think it's important. Whenever I run across a quilt in an antique shop, the first thing I think is, "I wonder who made it". I've never seen one labeled.

So I am making it a point to work on that and I thought I would share a few that I made yesterday while I pouted and sniffled my way through the day.

I made this one a few weeks ago for the Here Fishy Fishy Baby quilt for my niece's first baby. I mailed it last week and  I'll show it to you in a couple of days.


This label is for another quilt I just finished that took me an entire month to bind. That tells you how much time I've spent with needle and thread lately:


  And this one is now stitched to the back of the Barn Star quilt I finished back in January:


I made this one up for Bonnie's Hunter's Easy Street. It has been quilted, but still awaits a binding and looking at it, I will probably make another label on a lighter background. That blue doesn't read very well on the gray. Oops...missed clipping some thread tails on some of these.


And this one is for another quilt I just got back from the quilter's. I can not wait to tell you about this one, but it too still needs to be bound:


I made this one is for the King of the Jungle baby quilt that I need to finish next:


This label goes on the gigantic Western Scrappy Trips quilt that is on our bed. It is our Covered Wagon quilt, so named because a friend (Hi Saska!) said it was big enough to cover a covered wagon. I am thinking of embroidering our initials in the horseshoes.


And lastly, I made one for my Scrap Jar Stars quilt:


Once I make these labels, I really like them.


They don't take much time. I spend more time browsing through designs than it takes to make them. I only have access to a few fonts with the Digitizer Jr program I have, but it has served me well. Once in a while I think about purchasing the full fledged program, but when I think about shelling out that much dough, I just can't do it.

There are so many ways to label your quilts so consider this my public service announcement to just choose one and get those quilts labeled. I've printed some labels and used a pigma pen on others. These labels have a few tears on them, but at least they are finished. Now please excuse me while I go add a few more tears to a pillow.

Wednesday, October 9, 2013

The Best Kind of Sunday

Last Sunday was a perfectly, glorious fall day. The chickens are reaping the benefits of having leftovers when I have a crew to feed:


We had our first freeze the night before and I only knew about it when I walked out to the garden and saw that some of the leaves on my squash and zuchinni plants had shriveled and turned black.


 The tomatoes look fine and they are absolutely covered in fruit. I've never had tomato plants like this. Amazing what a little rain will do. The 2nd week in September was a wet one and the tomato plants just took off. They are over 5' tall and the tomato cages are not doing their job so I propped up some scrap panels to keep them upright.


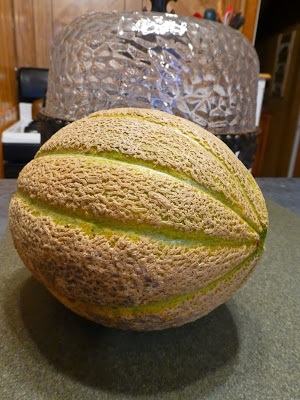
I even picked my first melon!


I was so excited! I'm picking something every day from my little garden and it thrills me to no end.


 I don't have a big garden because it is always a gamble about whether we'll have rain or not., but we have more than enough for us and plenty to put up and share with friends:


So, after a wonderful Sunday of puttering, I decided to go for a walk in the evening. 


About a mile from the house, I saw dust and my trusty sidekick, Gus, deserted me to run  and greet this guy:


Yep, our Marine is home! We knew he was driving from California, but we weren't sure when he would show up. He stopped to stay with a friend and then made a visit to my in-laws. He sure is sight for sore eyes! So I'm going to take a little sabbatical from blogging and soak up this kid while he's here.

Monday, October 7, 2013

Pecan Pie Mini Muffins

I have yet to find anyone who can resist these. I found this in a Taste of Home magazine years ago. I had a subscription to that magazine for over 20 years, but I have recently let it expire. I have been disappointed in the direction it has taken. Many of our favorite recipes hail from the pages of that magazine, but it just isn't the same. Sure, once in a while something will catch my eye, but it's just gotten a little too fancy for the way I cook.

According to the recipe I have, Pat Schrand, from Enterprise, Alabama shared this recipe with Taste of Home in 1997. I hope people think I'm a good cook, but I don't like to take credit for things that aren't my original idea. So if I AM a good cook, it's only because I have a great support staff behind the scenes that include recipes from treasured friends and from people like Pat. Sure do wish I had a support staff to help wash all these dishes! :)

Recently, I made these one morning with breakfast and the crew loved them. I set everything up in the kitchen and they walk through and fill their plates. They are polite and only take modest portions, and then they often come back for seconds. When I made these, as they put their plates up and headed for the door, they would sheepishly glance my way and their hands headed straight towards these left over muffins, popping them in their mouths as they jingled out the door. Does a cook's heart good to see that. :)

I've been scouring online cooking sites, and old cookbooks for new recipes and I've learned that although that sometimes unearths a promising new contender, if I dig a little deeper into my own collection, I find the real gems that I have neglected. This is one of those  gems.

This photo would have been much more appealing if I had taken it while I had the whole batch of muffins piled on here, but I was too late, and after they crew pulled out, there wasn't a muffin to be found. So this is all you get...until I make them again. ; )


Pecan Pie Mini Muffins

1 C packed, brown sugar
1/2 C flour - yes, that really is all it calls for. :)
1 C chopped pecans
2/3 C butter (no substitutes)
2 eggs, beaten

*In a bowl, combine brown sugar, flour, and pecans, set aside. In a 2nd bowl, combine butter and eggs; mix well. Stir into flour mixture until just moistened. Fill greased mini muffins tins 2/3 full. Bake at 350° for 20-25 minutes or until muffins test done. Remove immediately to cool on wire rack. Yields about 36 mini muffins and guaranteed to make eyes twinkle. :)

Friday, October 4, 2013

Keeper of the Bread Dough

I love making bread. There is something completely and utterly therapeutic about it. I know. Who has the time? But seriously, it doesn't really take that much time. Most of that time is spent letting it rise and you can just tend to the things you need to tend to while it does that. I can promise you that it is absolutely worth it.

I've made a lot of bread through the years, but my bread making has diminished considerably since we became empty nesters. We can't...nor should we...eat 36 Butterhorns and homemade bread is just better when it's fresh. So when I have a crew to feed, I get to indulge in my love for all things created with bread dough.

Sourdough bread tops the list, but sadly, due to the fact that we have cut back greatly on bread, my starter did not survive. DH became a connoisseur of sourdough some time ago and I can tell you that there is nothing like waking up to the smell of fresh sourdough biscuits being pulled from the oven to begin your day. He baked them in a dutch oven, of which we have many. He tinkered with each batch and every day he would inquire if we like THIS batch better than the one the day before and every day we would insist, with joyful, jam smeared faces, that the present batch was the very best ever...because it was.

So today I made Butterhorns. This is a recipe from my MIL, and I have made them umpteen times through the years. When T was here, I taught her how to make them. They are one of our most loved bread recipes although I'll probably repeat that sentence when I share the next bread recipe. I'm telling you, there is just something very lovely about fresh, homemade bread and if you've never made it, I'm urging you to give it a whirl. Pick a recipe. Any recipe, but here's the recipe for Butterhorns since that's what I made today.

Butterhorns

1 pkg dry yeast - I buy my yeast in bulk, usually at Sam's and I use a TBSP of yeast.
1/4 C warm water
3/4 milk, scalded
1/2 C shortening
1/2 C sugar
1 tsp salt
3 eggs, beaten
4 1/2 C flour
melted butter

*Soften yeast in warm water. Scald milk and add shortening, salt, and sugar. Cool to lukewarm in large bowl (I use my Bosch mixer with dough hooks). Add yeast and mix well. Add eggs, then flour and mix to smooth, soft dough. Knead lightly on floured surface. I don't knead much. Just turn it over a few times. As you work with bread dough, you'll find that sweet spot and it'll tell you when it's 'just right'. It's all in the feel of the dough. Place dough in greased bowl, turning once. This is my bread bowl:


  It's bigger than I need, but I had my eye on these bowls for a few years and when they went on clearance, I snatched one up. I fretted over whether to get this one or the bigger one, but I am so glad I chose this one. It's 14" across and I have yet to fill it completely up with anything, but I use it all the time.


Cover with the cutest tea towel you ever saw:


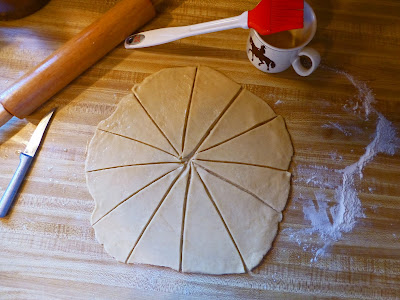
and let rise till double - about 1-2 hours. Divide dough into 3rds; roll each 3rd into a 12-15" circle on a lightly floured surface. Brush with melted butter and cut into 12 wedges.


Roll each wedge , starting with wide edge and rolling to point. Arrange rolls on a greased baking pan. Cover with more cute tea towels:


and let rise until very light - about  a couple of hours. Bake in 400° oven for about 15 minutes or until lightly browned. Makes 36 rolls.


Note: Do not sit down to sew or make greeting cards or run out to the barn or garden. You will lose track of time and burn the rolls. Or maybe that's just me! :)
Related Posts Plugin for WordPress, Blogger...